|
|
Collimating a Newtonian (Dobsonian) Telescope Using a Laser Collimating ToolThe process of collimation is very important, so let's start from the very beginning. Most of this you only have to do once for any telescope, and the easy parts can be done in minutes every time you take the telescope out. Do this in the daylight to make your life easier. Collimation is done in two parts; Mechanical and Optical Collimation.
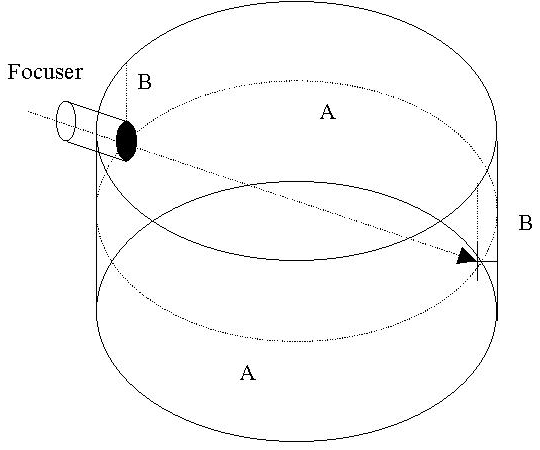
First we'll find the point exactly opposite your focuser. This is the exact point that the focus tube SHOULD be pointed at. Many times they're not and this result in a collimation that is not using all of the light from the primary.
Figure 1 - Newtonian Upper Tube Assembly With Secondary and Spider Removed Using a flexible ruler, measure from the inside of your telescope's tube, starting at the center of the focuser hole, around the inside circumference to the opposite side (Dimensions A). Measure in both directions, when the two measurements are equal, make small marks in pencil. Next measure from the end of the tube down to the middle of your focus tube (Dimensions B). Apply this measurement down from the end of the tube on the opposite side of the tube, aligned with your previous marks, and you should now make a point exactly opposite where your focuser SHOULD be pointed. Put your laser collimator in the focuser and turn it on. Does the light strike the exact center of your new dot on the opposite side of the tube? If not you may have to shim your focuser to get the laser to line up with the dot. Once this is done, the focus tube is 'square' with the telescope tube and you're ready to move on. The next thing to do is to mark the exact center of the secondary with a small black permanent ink dot (see "Marking the Secondary and Primary Mirrors" below). This will not degrade the image at all since the dot will still be in the extremely small shadow of the secondary mirror as reflected up from the primary. Then you must physically center the secondary mirror as viewed through the Cheshire eyepiece. This usually entails raising or lowering it with the mirror's center mount screw and then aligning it right and left by actually turning the secondary back and forth (do not accidentally touch the secondary!) Take the telescope outside in the evening twilight. After the mirror cools down sufficiently, the Optical Collimation collimating can begin. Don't collimate before your optics have cooled down. The curvature of 'fast' optics changes noticeably with temperature. If you collimate at dusk, be sure to check it again after a few hours. You will find that temperature and humidity changes have changed the collimation of your primary. Fine tune it and your collimation will be set for the rest of the night. Put the red dot of the laser collimator exactly on the center of the little black dot on the secondary. Use the adjustment screws of the secondary to move the laser dot to the center of your primary. ( I have a self-adhesive blackened paper punch hole reinforcement ring around a point at the exact center of my mirror.) Then go to the back end of the telescope and use the primary mirror collimation screws to reflect the laser dot back to the exact center of the target on the laser collimator and you're done. NOTE: Be careful to not jar your telescope after performing this collimation, or you may find that it will have to be re-done from the point of centering the laser dot on the secondary mirror through adjusting the primary mirror's collimation screws. Star Test Fine Collimation ProcedureReference: Torus Technologies Use the following procedure to collimate your optics using a star: 1. Select a star that is at least third magnitude or brighter and 60 degrees or more above the horizon. 2. Center the star in the field of view of an eyepiece as precisely as possible. If you have a reticule eyepiece, use it for this test. 3. Defocus the image of the star until it fills about half the diameter of the field of view of the eyepiece. You will see a dark spot in (or near) the center of the defocused star image created by the secondary mirror and dark lines radiating from the dark spot created by the spider vanes. Also you should see a series of diffraction rings inside the defocused star image. During this procedure you will adjust the primary mirror until the dark spot is exactly centered in the star image and the diffraction rings appear concentric. 4. Use the primary mirror adjustment procedure above to make the final fine collimation adjustments.
Make adjustments that cause the dark spot to move toward the center of the ring pattern.
After each adjustment, re-center the defocused star image. Marking the Secondary and Primary MirrorsHow do you mark the exact center of your secondary and primary? If you remove your secondary very carefully and trace around it (mirror side up so you don't scratch it!) on some quality printing paper, you will be able to fold the ellipse in half along both axes. Where the folds cross is the center. Now unfold the paper and make a very fine hole in the center with a straight pin. Carefully flatten out the paper, and align exactly and gently on the face of the mirror. Take a fine point black marker, touch it to the hole in the paper and it will transfer a fine black dot in the center of the mirror. Carefully reinstall the secondary, again being careful not to touch the face of the mirror. The center of the primary can be found in much the same way except use a large piece of newspaper, or even better - some butchers paper. Gift wrapping paper also works well. The dot on the primary can bigger, but instead, try making a small dot and then placing a self-adhesive paper reinforcing 'doughnut' that has been previously colored flat black with a marker around your fine dot. This makes seeing the laser dot centered on the primary much easier. (Use the self adhesive kind of doughnuts. The old lick-and-stick reinforcing doughnuts will slide off the first time there is dew on your primary.) Finger prints are a big problem when putting on the primary doughnut. Just do it slowly and carefully, perhaps using tweezers and wearing soft white gloves. Don't lean on the mirror. If you smudge the mirror. Just leave it, don't clean it off by wiping as this will probably leave fine scratches on the surface of the mirror.
Further References:
11/2011 |
|