|
|
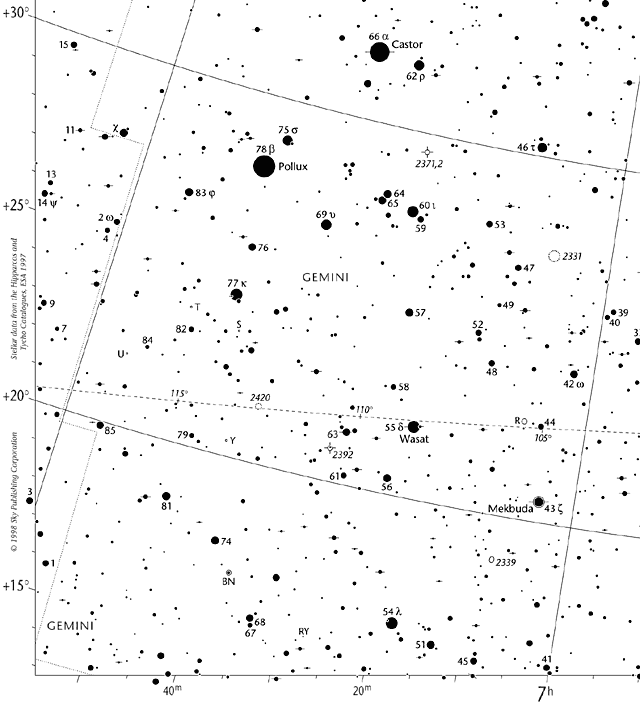
Using a Map at the TelescopeBy Alan M. MacRobertReference: http://skyandtelescope.com/howto/scopes/ By the time you set out into the night with a telescope, you should know the constellations well enough to find your way around the sky. An all-sky constellation map (such as the one in or near the center of Sky & Telescope magazine every month, or the personalized one you can generate here) will get you started. So will a planisphere. Think of your all-sky map as like a map of the world, or a globe; if you don't know where Japan or England are, you need to learn. But once you've found England on a world map, it's not much good for getting you to a particular street address in Tunbridge Wells. In addition to a wide-scale constellation guide, an astronomer needs a more detailed, magnified sky atlas in order to locate specific points of interest. One of the most widely used atlases is Wil Tirion and Sky & Telescope senior editor Roger W. Sinnott's Sky Atlas 2000.0, now in its second edition. It covers the celestial sphere in 26 big charts that plot a total of 43,000 stars and 2,500 other objects. Such maps may look terribly complex at first. But step back for a minute and look at only the brighter stars; they form the same constellation patterns familiar from your naked-eye all-sky map. Directions and DistancesSuppose, for instance, you've learned Gemini as it's drawn on the monthly Sky & Telescope charts, where the stars are connected to form two stick figures holding hands. The brightest stars in Gemini (like Pollux and Castor) appear on Chart 5 of Sky Atlas 2000.0 — but at a larger scale and almost lost in a wealth of detail.
First get familiar with directions on the map. East, you'll notice, is left of north on sky maps, not to the right like on maps of the ground. The reason is simple: You look down at the ground but up at the sky. (If you looked up through the bottom of a land map of, say, the United States — as if you were at the center of a transparent Earth — it too would have east left when north was up.) One trick for keeping east and west straight on a celestial map is remembering that right ascension increases to the east. If hours of right ascension are printed on the map, they'll set you straight. The next step is to learn the map's scale. You have to know how much of what's printed on paper appears in the eyepiece of your finderscope before you can compare the map to what you see! First determine the size of your finderscope's field. Locate two stars that just fit into its edges (try pairs in the Big Dipper or Cassiopeia). Then see how many degrees apart these stars are on the map, by referring to the declination scale along the sides. That's the diameter of your finder's field. Now do the same to find the field diameter of the main telescope's lowest-power eyepiece. It will probably be only about 1° or so — the area of sky your little fingernail covers at arm's length. This is so small that it may be hard to identify a good star pair on your map to measure the field size. Here's another way. Aim at any star within about 10° of the celestial equator — in Orion's Belt, for example, or the Circlet of Pisces. Center the star. Then turn off the telescope's clock drive (if any) and time how long the star takes to drift from the center to the field's edge. The time in seconds, divided by 120, equals the diameter of the field in degrees. Now, using the scale on the margin of the charts, make little rings out of wire — or draw circles on clear plastic — corresponding to your field sizes. By sliding these circles across the charts, you can see exactly what star patterns will pass through your field of view when you sweep across the sky. Beginners are always surprised at how tiny the view really is. Keep these little tools with the charts; you'll need them whenever you observe. Now we're ready to go on our first deep-sky hunt.
A Practice Star-HopAny observing session should begin with some indoor planning. Let's use Gemini for a dry run. If you know the constellations, you can find its two bright stars, Castor and Pollux, in the sky. These will be our starting point. A couple inches south of Castor on Chart 5 of Sky Atlas 2000.0 is the planetary nebula NGC 2392, the Eskimo Nebula. It is indicated by a little open circle with four spikes. This looks like it might be a nice item to check out. We look it up in Burnham's Celestial Handbook, and learn that it is a small, round 8th-magnitude glow, which is bright enough to show up in most telescopes. So far so good. The next step is to plan how to get there by star-hopping. This just means following a trail of stars to move the telescope from a place we know, such as Pollux, to some place we don't, such as the location of the nebula. The trick is not to get lost on the way. Take the wire ring that corresponds to your finder's field and center it on Pollux. Several fainter stars are in the circle, just as they would be if you were looking through the finderscope at the sky. The bright star closest to Pollux is 75 or Sigma Geminorum, to the north of Pollux (in the direction of Castor, which is out of the field of view). Near the southwest edge of the field is the star 69 or Upsilon Geminorum. It forms a long right triangle with Pollux and 75; Pollux is at the right angle. This triangle confirms 69's identity in the sky, where there's no convenient label next to it. Shift the wire ring to center on 69; this corresponds to moving the telescope. Two new pairs of stars have now entered the west edge of the field a little north of center: 64, 65, 60, and 59, the four of them forming a distinctive shape. Shift the ring to center on 60. The fainter 59 just to its southwest will confirm you've got the right one. Star 57 is now just on the south edge of the field. Shift south by half the width of the field so 57 is centered; bright Delta is now waiting just outside to the south. Shift south again an equal amount; Delta quickly appears and can be centered just after 57 leaves to the north. See how Delta forms an equilateral triangle with 56 and 63, to its south and east? With 63 now identified — aided by two fainter stars on either side of it — we're less than 1° from our prey. Note the flat triangle that 63 and 61 form with the nebula. The shape of the triangle allows us to target the correct position even if the nebula is invisible, as it may be in the finder. The two faint stars just southeast of the nebula will help confirm the exact spot.
From Map to Sky: Know Your DirectionsIf we do this outdoors at night and move the telescope to match each step on the map, NGC 2392 should now be visible in the main eyepiece: a small, dim, eerie round glow quite unlike the pointlike stars, grayish-green in color and with a very faint star at its exact center — a prize worthy of the rather complicated chase. The star-hopping route may seem like a lot of trouble to the beginner, whose impulse is just to sweep from Pollux "about the right distance that way." But most deep-sky objects are many times dimmer than the faintest stars on the chart and won't catch your attention even if, by luck, your tiny telescopic field happens to sweep right across them. The only way to succeed is to know exactly where you are at all times. If you suspect you're lost, go back and start over. Have patience. You'll speed up later when practice increases your skill. The biggest pitfall in going from map to sky is keeping directions straight. Remember that in the sky, celestial north is not up but toward Polaris, no matter how cockeyed this direction may be in the eyepiece. To find north as seen in the eyepiece, just nudge the telescope a bit toward Polaris. New stars will enter from the field's north side, showing you where this is. Turn the map around accordingly, so north on the map is oriented in this direction. This north-nudging trick will become such a habit at the telescope that you'll forget you're even doing it. If you have an equatorial mount, turn the eyepiece of the finderscope so the crosshairs line up with the telescope's motion as you sweep north-south or east-west. The crosshairs will now mark the four cardinal directions no matter where you point the scope. Okay — you've found north in the eyepiece. East and west can be a bit trickier, depending on your telescope. East is 90° counterclockwise from north if you're looking at a "correct" or right-reading image, just like on a map. A correct image is given by an optical system that has an even number of mirrors. Examples are a Newtonian reflector, which has two mirrors, or a straight-through refractor, which has zero. But east is 90° clockwise from north in a mirror image, which is what you see in any optical system that reflects light an odd number of times. A mirror image view is very hard to compare with a correct-image map. Note that this is not the same as the image merely being turned upside down. In that case you could just turn the map upside down too. A mirror image cannot be made correct no matter how you turn it. The usual culprit is a star diagonal on a refractor or Schmidt-Cassegrain telescope. To get a correct image you can simply take out the diagonal and reinsert the eyepiece to view straight through. This is especially important to do to your finderscope, if it came with a diagonal. But straight-through viewing with your main telescope is rarely practical unless your target is near the horizon. Alternatively, you can photocopy your map, turn the photocopy over, and shine a flashlight up through the paper from beneath to view a mirror image of the printing through the paper. Better yet, photocopy maps onto clear acetate Viewgraph sheets, turn the Viewgraphs over, and tape them to a red background. Some amateurs who insist on using their star diagonals while star-hopping have resorted to propping up a small mirror on their chart table and viewing their maps in the mirror. This way you see what you get. Or you can buy a diagonal that is made with an Amici prism, which employs two reflections instead of an ordinary diagonal's one; it will rectify the view at the cost of some lost image sharpness and brightness. When star-hopping, always think in terms of north, south, east, and west — never up, down, left, or right, or you'll quickly get lost in trackless wastes of space. Once you get the hang of it you'll always be mumbling as you turn from map to scope: "Starting from that bright one in the north of the kite shape . . . half a finder field east to the pair in the skinny triangle . . . then a quarter finder field south to the one at the west end of the flat triangle . . . " Triangles are the most basic units of star-hop patterns, and you'll be seeing a lot of them! Alan MacRobert is a senior editor of Sky & Telescope magazine and an avid backyard astronomer.
11/2011 | ||||||||
|